
You can consider this a public service announcement or at the very least an attempt to introduce you to the wonderful world of thermal compounds. I am writing this because I had a talk with my wife earlier today and she mentioned how many warranty problems her employer has had with Dell systems overheating. The IT person she spoke to didn’t know what Arctic Silver was so I figured it had to be covered. Ankle deep water, you’ve been warned.
The Processor
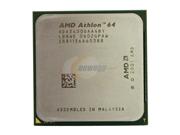 To the left is the computer processor, the CPU. This little beast can run over hundred degrees F and is perhaps the most sensitive (and generally the most expensive) component of your PC. This is what Intel has spent billions of dollars on in seemingly worthless commercials featuring the Blue Man Group. What they sell is the silicon assembly to the left. I’ve selected the one from AMD as you can tell.
The Heatsink
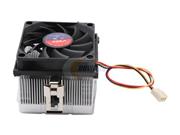 The heatsink, or the heatsink assembly, is a collection of devices that help spread the heat generated by the operation of the processor over a greater surface. As you can tell from the processor above, the surface area is quite small so even fanning that surface is usually a futile attempt. Without a heatsink to spread the surface area and a fan to flow the air through the system the processor would overheat and burn.
Now the bottom of your heatsink generally comes with a thermal transfer compound. This compound melts and bonds with the processor to create a cohesive thermal transfer from the processors surface with the collective surface of the heatsink. This can go on into the laws of thermodynamics and considering I got a B in college physics I don’t really want to shame myself again. Just take my word on this, the greater the surface the more room for heat to spread thus the overall lower temperature at any given spot on the processor.
The Problem
The problem with overheating systems is generally that of the thermal compound. Over time the thermal paste that your computer maker managed to shave 0.0003 cents off by bying a cheaper mix will lead to the less effective heat transfer from the processor to the heatsink assembly. The less effective the heat transfer gets, the warmer the processor gets and the warmer the surrounding area gets. As the system runs warmer other components start heating up and… well, back to the thermodynamics. In simple terms: “can you smell something? it smells like someone burned a plastic fork.”
There are many programs out there that will give you an idea of how hot your system is running. One of the best (and free) is the SiSoft Sandra and it can tell you just how hot your system is. Nearly all modern boards have sensors that report back in realtime how things are going. The more load you put on your processor the warmer it gets so you can test your temperature at the low load (from the BIOS for example) or at full blast while playing that new FPS game. So lets assume you find out your processor is running hot (70 degrees Celsius for example) – what to do, what to do?
The Process
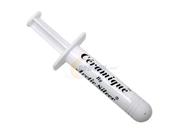
The solution is simple: Buy a quality thermal compound. We use Arctic Silver 5 and Arctic Silver Ceramique.
If your computer is up and running: You have two options, either run your computer under high utilization for a while (give it a whole bunch of benchmark tests and let it run em for 10 minutes) or disassemble the PC and melt the current thermal compound by hand. Either way, unless you’re a girly man you should not be putting in a significant force to separate the heatsink assembly from the processor – if you are odds are that you’ll end up ripping your processor out of its socket. Or you haven’t disconnected the heatsink assembly from the motherboard – in which case you’ll be ripping out the motherboard from the case. Either mistake will yield hilarious results so please take a moment to RTFM before you do this. You want to separate the heatsink assembly from the processor. Then you want to clean off both the processor and the heatsink of any thermal residue (usually gray stuff) which can be done with simple rubbing alcohol. There is something more sophisticated you can use but I never have and don’t quite remember what its called. Just whatever you do, don’t take the screwdriver to it. If you’re chipping this paste off the processor in the same way people engraved tablets… you’re heading in the wrong direction.
 If you’re assembling the brand new PC – just strip out the ghetto cheap compond from the bottom of your new heatsink. You can do so with a razor and finish off with an alcohol cleanup. It really is quite simple.
 The installation? Very very simple. Just drip one grain (very little tiny dot) of thermal compound onto the top of the chip, set the heatsink back on, rock it a little bit and secure the assembly. Don’t worry about painting it edge to edge, or trying to level it off. It’s not a cake to be frosted, it is a thermal compound that assures the place with the most heat generated (directly above the processor’s core) has the best bonding to the heatsink assembly.
The cost
The cost is surprisingly low. The picture above shows the Arctic Silver Ceramique which you can get from NewEgg for $5. This tube will cover 20 processors at least so you’re not talking about a significant amount of money at all. Not to mention the fact that its not even close to what a shipping charge would be if you had to ship that Dell back to them to take a look at or to your neighborhood IT shop.
So there you have it – one $5 tube and a weekend project can put a whole new life into your PC and give it a lot more room to breathe. I’m done with suggestive puns, hope you give this a shot. Proper thermal management of your PC is not something that just gamers and overclockers do, many big IT firms (such as mine) do this to reduce cooling costs and it turns into millions of dollars worth of savings. I’m not suggesting you go out and buy a $300 liquid cooling system, just a $5 tube of thermal compound.
Read more about this on the web, check your temperature and if you’re in any way responsible for computers and are learning about this for the first time…. Maaaaaaaaan. Smack.
Update 1: It didn’t take a long time to get a bunch of questions on this one.
How do I melt it by hand?
Point the fan directly at the heatsink (“the metal looking part”) and run it for a few minutes until it becomes hot. If it starts turning orange you’ve gone too far. Basically keep it going but don’t let it heat until you burn yourself! DO NOT run the heat at high and do not point it at the motherboard – your goal here isn’t to melt the surrounding components, it is to heat up the heatsink so that the thermal compound will lose grip from the processor.
Does this work on server processors?
Yep, works on all sorts of processors even on video cards.
Define “hot”…
Difficult subjective question. Generally for Pentium 4 processors temperature over 60 at semi-idle speeds is a lot. The Northwood core runs a lot cooler than the Prescott core. Intel Core 2 Duo’s are in the similar ballpark. Basically, expect it to idle in 40’s and heat up through 50’s under heavy load. Athlon AMD 64 processors are a few degrees less than that, in my experience at least 10 degrees.. I don’t offer/extend advice on performance metrics so try hitting the overclocker boards and find out what they claim as their “stock” temperatures (that is, the temperature reached by the retail processor with the stock/enclosed/included heatsink/thermal pad).
Keep em coming…
Pingback: Find a Blog » Blog Archive » Overheating for Dummies